Monday, September 29, 2014

Bathroom Builder


When we made the move down south we wanted to make sure that our friends and family would be accommodated when they came down for visits. We are fortunate that the cabin we bought has a basement. So we decided to turn part of it into a master suite with its own bathroom.

 I've been part of construction jobs in the past and have absorbed as much info as I could from my carpenter father over the years, but up to this point I have never tackled a project to this scale on my own. I'm glad I did though. I learned a lot about electrical, plumbing and patience. 

My daughter helped me pick rocks from the property to use as the boarder in the tile walls. My wife helped with painting and furnishings. We love how it turned out and have had several happy visitors since it's completion.

And...still no leaks. 

-Jacob 


Monday, September 15, 2014

To the country we go!


Its been a while since I've posted anything because, well, we've just been busy as hell. Last October we sold our home in the burbs of Milwaukee, Wisconsin and moved south. We found a gem of a property in the middle of Tennessee. Lots of land, hills, trees and sky to soak in. In addition to this huge change we also welcomed our son into the world in February. So, yeah,  been a little busy. 
Although I have managed to take on some fairly intense projects to further our dreams of homesteading in the country. 
I'll share some of these projects with you soon.  

Happy homesteading everyone!

-Jacob 

Monday, September 30, 2013

Arizona Ice Tea - Rocket Stove

I've seen a few videos online of people making Rocket Stoves using plastic 5-gallon pails as the outer shell. This was interesting to me as I would think that the plastic would melt pretty severely and eventually all of your insulation would leak out.  The videos I've seen did not show that as far as I could see, so I decided to try it out for myself.  Instead of using a 5-gallon pail with thick plastic I thought I'd use a normal juice jug that everyone has in their trash...In my case I used an Arizona Ice Tea jug which had the added benefit of a handle.  The plastic of the jug is considerably thinner than a 5-gallon pail, so I expected it to melt pretty bad.  I constructed the usual soup can "L"formation this time having a two-can fuel input section and a two-can stack plus the addition of an Arizona Ice Tea tall can to extend the stack and give a better vacuum.  I made all my cuts and put it all together using normal play box sand as my insulation layer.

I fired it up and it worked great!  Probably the best one I've made yet.  After letting it burn and feeding it for about 2 hours it was still performing strongly...there was some melting of the jug around the stack and the fuel input cans, but not enough to let the sand spill out.  I'm pretty shocked that this worked as well as it did, and with the cool little handle you can actually pick it up and move it around while lit. (Although I wouldn't recommend doing that for safety reasons.)

So, long story short...plastic is a reasonable option for the outer shell of a Rocket Stove.  Probably won't last forever, but it's more readily available than a paint can sometimes and easier to cut.

-Jacob


Monday, August 19, 2013

BBQ Sauce Bottles

A friend of mine celebrated his 40th birthday recently and I took the opportunity to carve a couple of bottles for him as a gift.  He is a great cook and enjoys creating his own blends of hot sauce and bbq sauce.  When we met 4 years ago he gave me two bottles of his sauce to enjoy and I still had the bottles he gave me stashed away.  They worked as perfect canvases for his gift.
He loved them!

-Jacob


Tuesday, July 2, 2013

Custom Engraved Wine Bottles and Glasses

I was recently asked to make some party favors for my mother in laws 60th birthday party. She wanted some wine bottles and wine glasses engraved for her guests.  I put the guest's name and the date they met the birthday girl on the glasses and a floral design with the first letter of each of their names on the wine bottles...six bottles and six glasses.

They turned out nice and the guests liked them!  I was also glad I didn't get a lap full of wine while carving as this was the first time I'd done full bottles.  Pleased with the results and will definitely be doing more full bottles in the future...great gift idea!

-Jacob


Rocket Stove - version #1

So, I've been getting into alternative ways of doing things to save energy and money around my house.  I'm exploring things such as solar for electricity and for passive water heating, and wind energy for electricity.  I'm sure some of my projects dealing with these subjects will be featured in this blog in the future.  In the spirit of saving energy, I thought it would be cool to cook off the grid on a regular basis. With it finally being summer and the weather being nice, I enjoy firing up the BBQ and cooking outside as much as possible.  But that takes either a tank of expensive propane or a bag of expensive charcoal.  I've seen a few videos about rocket stoves online and thought I'd give making one a try to see if I could actually cook with it outside.  The idea behind a rocket stove is that it gets really hot with a very small amount of fuel.  Small sticks are used for fuel which I have plenty of around my wooded lot.  Sounds great! So off I went cutting cans like a mad man until I had a version #1 of my rocket stove.

I used three soup cans and a one gallon empty paint bucket.  You make a sort of "L" shape out of the three soup cans and fit that into the paint can with both ends of the "L" sticking out of the larger paint can.  When the soup cans are in place you fill the paint can around them with an insulator.  I used regular play sand, but some people use vermiculite because it is much lighter than sand and if you plan on taking your stove camping or on the road the lighter the better. You feed fuel or small sticks into the bottom of the "L" and the angle area of the "L" becomes a combustion chamber as the stack of the "L" creates a vacuum and pulls clean air in through the bottom creating a "Rocket" effect and lots of heat.

My first version worked ok, but never got hot enough to boil water.  I'd later figured out that my stack on top was not tall enough and wasn't creating a strong enough vacuum to stoke the fire below.  So I added another can to the stack.  It created a better vacuum, but in the process of adding a new can I bent the one below.  Now the air doesn't know what to do and it is still very inefficient.

So, I think for version #2 I'll be using steel tubing rather than soup cans to see if I can make a more permanent one that can be welded and will actually work.  Sick of cutting my knuckles on empty soup cans...lol.

-Jacob


Wednesday, June 12, 2013

1971 - cl350 - caferacer - Honda

1971 - cl350 - caferacer - Honda

I've reassembled the front end with the newly polished triple tree and the newly finished headlight bucket.  I also redid all the wiring in the bucket.  I may keep it all as is instead of lowering it as I had mentioned in a previous post.  The stock location of  the gauges has kind of grown on me...especially now that I have the gas tank in its final position.  I raised the back end of the gas tank about one and a half inches by making a bracket and welding it onto the frame.  Then just drilled a couple holes and there you have it.  I also cut off the old mounting bracket.  Now I'm truly ready to fabricate the rest of the seat.  I think I'm going to try to hide the tail light inside the back cowl to clean up the back end a bit.  Should be interesting...

-Jacob


Friday, April 19, 2013

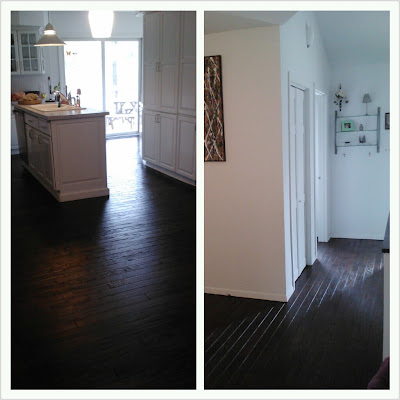
Floors refinished!

Well...refinished my floors...that was a lot of work.  I used espresso colored stain and then two coats of clear satin polyurethane.   I also sanded the whole thing before staining.  Turned out great!
-Jacob

Skull bottle engravings

I made a set of three skull engravings on some green bottles.   First time I used the new flex bit on the dremel.   Worked great and I was able to spend more time carving without breaking my wrist.
- Jacob

Friday, March 22, 2013

Customized Glass Bottles

Being the experienced drinker of fine bourbons and wines that I am...there never seems to be a lack of empty glass bottles around.   So instead of just tossing these beautiful objects in the trash I've started to save them for a new project.

I was lucky to receive a new Dremel tool as a gift.  Pretty much the coolest thing ever.  As I experimented with the different bits that I got with it I discovered how fun it is to carve and etch glass...

So a new hobby is born...as though I need another hobby.

This is one of my first bottles.  I like how it turned out.  Stay tuned...more to come!

-Jacob


Tuesday, March 19, 2013

Bocaj Industries - More Than Motorcycles!

Until now this blog has been mainly for cataloging the progress on my motorcycle build.  Well, it will continue to do that, but in addition, I will be adding some new content from time to time.  Basically whatever other creative projects I may be working on that I think are cool and would like to share.

So, on that note...

Pan Target-
Have you ever wondered what to do with all those old, useless, worn out pots and pans?  Shoot them!
I welded up a nice little frame out of some thin wall tube steel I had from an old carport.    The two cross bars are detachable with pins so you can take it apart for transport or storage.  The targets are just some old pans that have ruined their last egg.  Added a little paint so you can see where you hit.  When the pans are worn out I'm sure I'll have some more to add to the cause.

-Jacob


Tuesday, February 12, 2013

Bocaj Industries - 1971 Honda CL350

A couple of improvements to mention today.  Being the dead of winter here in good old Wisconsin, I haven't gotten much opportunity to get out in the garage and weld.  So the seat sits, still mocked up in cardboard waiting to realize it's full potential as a shiny metal creation.  Oddly enough, I did find enough time to stare at this thing for a while only to realize I don't care much for the line of the front end.  The gauges and headlight bucket are too high as well as the handlebars...So, I decided to tear it all down and try a new approach.  I'll be running new headlight ears moved lower on the trees and will fabricate a new bracket for the tachometer and speedometer to lower them as well.  I've also decided to run clip-on handlebars to lower the stance of the bars while bringing up the angle of the grips for a more comfortable ride compared to the one piece clubman bars I had on before.   The idea is to make the gas cap the highest part of the line of the bike.  In the process of making these changes I've refinished the headlight bucket to match the bare metal tank and polished the hell out of the triple tree.

-Bocaj


Monday, November 12, 2012


Bocaj Industries - 1971 Honda CL350 Cafe Racer

Now that the electrical is well on its way to being done, I have the opportunity to focus on the seat for a while.  The first step for me for creating a new seat pan is to have a nice flat surface to work off of.  So, this brings up the first issue...the battery.  As it sits in it's factory location, it sticks up about an inch and a half above the frame.  This is no good if you want your seat pan to sit flat on the frame.  So, I made two small brackets and modified the battery box to attach to these brackets.  After reinstalling the battery box with it's new mounting points it now sits about half an inch below the frame. 

Next, I was able to get some sheet metal and lay it flat on the frame to get a rough sketch of the shape I needed to cut out.  I got the metal cut to a nice shape I liked and then carefully rolled the edges for a nice finished look.  Finally I added the little kick-up on the tail of the seat.  Fits great!

I had been on the fence about the design of this seat for a while as to weather or not it should have some kind of cowl on the back or if it should just be flat.  After some heavy duty staring I decided to mock up a cowl with some cereal boxes which work awesome for sheet metal mock up by the way.  I fell in love with the result.  Now I have a nice template to use to cut out the cowl section from sheet metal.  I'll tig weld it all together when I have all the pieces cut out and ready to go.  One last little touch to complete the look and line of the bike is I raised the back of the tank about 1.5 inches so the line on the bottom of the tank now flows nicely into the new seat.  I'll need to make a bracket to keep the tank in this new position.  I also still need to work on the front section of the seat to create a small curved cowl to fit over the gas tank mounting brackets.  So, a little more work to do on the mock-up stage of the seat and then some fun welding in my future. 


-Bocaj


Tuesday, July 24, 2012

LIGHTS!  Played with some battery acid and got that bad boy all charged up and installed.  Got the new LED turn signals and tail light all wired up as well as the new headlight.  I also got a new rear brake light indicator switch that connects to the rear brake foot pedal.  The old one was not working.   Nice and bright and fun to see some "life" in this motorcycle!  The turn signals do not flash right now because they are LED bulbs and don't pull enough of a load to trigger the stock flasher relay, so I need to get a new electronic flasher relay to replace the stock one and we'll be in business.  The speedometer and tachometer light up nice as well.  Also working well is the starter!  I can't wait to get some gas lines run and fire this thing up...Work on the new seat is well underway.  Stay tuned.
-Bocaj


Thursday, July 19, 2012

I love getting new parts in the mail!  The new sprocket keeper and bolts showed up yesterday and I found some time to install it right away along with cleaning up the area under the sprocket cover.  With the sprocket securely attached and my clutch adjustment put back together I could mount the drive chain and put the sprocket cover back on the engine.  The foot control shifter can now go back on too.  
-Bocaj